


Cased hole finishing is quite different in term of operation, tools and techniques so people need to fully understand about this topic. The cased hole fishing video training by Weatherford is the last video training for the fishing operation series. This will help you understand about overall about cased hole fishing in many aspects.
Cased Hole Fishing Video Transcription
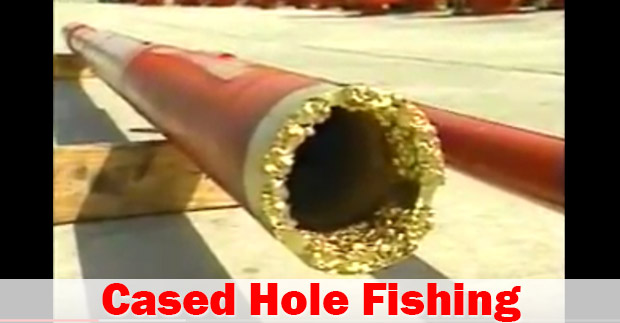
Many of the tools and techniques common in open hole fishing cannot be used in cased hole operations due to the restrictive nature of the casing. Sidetracking for example, an easy option and open hole was not widely used in cased hole situations until recently. The most common case whole fishing projects involve removal of stock production strains. Stock production tubing can result from collapsed casing when used tubing or tubing in casing leaks that allows sand and other debris to enter the casing annulus. Dehydrated mud in the casing annulus can also stick to the string.
With stuck pipe or tubing, the first step is to determine the free point or stuck point of the fish. Using a three-point indicator run on wireline, the start point can be determined and a free tubing removed to this point. In single completions with one string of production tubing and casing, sanded up or much stuck to being can be freed by a conventional wash over operation. A shoe run on washed pipe is lowered over the fish. And sand or mud is circulated back to the surface for removal from the wellbore. Unlike shoes used in open hole operations, cased hole wash over shoes have smooth exteriors to prevent damage to the casing.
Next, the trip is made with an overshot and jarring assembly to engage the fish. When the washer over has freed all of the remaining fish, it is pulled from the hole. If only part of the fish is free following washing over, the freed portion is cut or backed off and pulled so another washover can begin. If the inside of the fish is plugged preventing entry of wireline tools, the tubing can be recovered with an outside cutter. Following washover, the shoe is removed and replaced by an outside cutter on the bottom of the washover string. The cutter is run over the top of the fish to the desired depth and the tubing is mechanically cut by rotating the string.the cutter then acts as a retriever and the plug tubing can now be brought to the surface inside the wash pipe.
Removal of permanent packers from the well also calls for unique fishing tools and techniques. Several different types of packer retrievers are used depending on packer accessories used during completion. A proven method to retrieve a permanent packer in one trip and list the use of a packer retriever soundly. Its custom-made tungsten carbide faced shoe is dressed to near casing id so it cuts only the slip section of the packer. Adding above the shoe prevents damage to the casing wall. The retrieving assembly with the correctly selected grapple for the packer bore is run below hydraulic jars, colors and a boot basket which collects metal debris cut loose by the shoe. The spear and extension in the assembly is lowered through the packer. Milling over proceeds until the packer is milled free. The spear engages the packer body and it is removed from the well. This standard method of packer retrieval works only if there is no tailpipe below the packer or if a mill out extension has been installed when the packer was running the hole.
If sealed bore extensions are located below the packers without a mill out extension, another type of packer retriever assembly is run for one trip recovery. It incorporates a top bushing that crosses over from a boot basket to the washpipe extension. A j-latch assembly with washpipe connections at the top and bottom and a burning shoe connected to the inside of the j-latch assembly is a man rule: spear extensions, spear stop sub and spear. The assembly is lowered into the well until the spear stabs into the packer manrule. A gentle pull on the spear confirms that the packer is engaged. J-latches are released, the shoe is lowered, and rotation begins to mill over the packer. With the packer milled free, the string is picked up until the j-latches are secured into the assembly and the packer engaged by the spear is removed from the well.
Multiple completions where more than one string of tubing is placed side by side in the casing. Present another challenge. Wahsover is not an option here because of the limited space in the casing. Instead, the repirator will use a specialized washed down mill run on the end of a small tubing string. Debris is washed from the casing annulus and circulated from the well.
in sandy environments, a gravel pack assembly may be located below the packer. Its removal is accomplished using conventional washover, milling and retrieval tools. However, when rapid sand backfilling is likely and where the gravel pack assembly may become restart while tripping the by foreign overshot, a trip saver tool is recommended. The trip saver is run in place of the top bushing of the washpipe. It provides a mandrel on which an overshot can be placed inside the washpipe. After wash over has completed, the well as circulated clean. The manrole with the overshot is released from the washpipe top and lowered until the overshot latches to the gravel pack assembly ensuring efficient one trip retrieval.
Another major area requiring cased hole fishing focuses on casing problems themselves. When leaks are located in free pipe above the cemented level of the casing, the casing is cut or backed off below the problem area and replaced with new pipe. If the casing was backed off, the new casing is run back in the well and the string is screwed back together. If the casing was cut, it is dressed off to remove birders and external casing badges then screwed onto a string of new casing and running the hole. The patches engaged on to the or gazing in a manner similar to an overshot and the gentle upward pull collapses the seal assembly made of lead or rubber around the casing. The entire string is pressure-tested to ensure a good seal.
When casing leaks are located below the cemented level making them inaccessible to retrieve and repair and all other repair attempts have failed such as squeeze cementing, home co internal casing patches are recommended. Originally designed to seal unwanted perforations, they have proven to be very effective in sealing most types of casing leaks. The home co internal casing patch is made of corrugated steel covered with a fiberglass mat and coated with an epoxy resin prior to running. The patch is positioned over the leak area and is set by hydraulically pulling up collitic expander through the corrugated patch flattening it against the casing wall. The resin extrudes in and around the fiberglass mat serving as a secondary sealing agent. The setting too is then retrieved while the epoxy sats. The standard home co steel liner patch has a 1/8 inch steel wall thickness leaving a total casing id reduction of 3/8 of an inch.
In special situations where higher pressure is a concern, a heavier 3/16 inch patch is available. Also supplies led wrapped patches for high-temperature situations. If the weather operator finds the casing problem is more severe such as collapsed or parted casing, more aggressive measures must be undertaken. With slightly collapsed casing, the common tool used is a casing roller. In this procedure, a set of hydraulic jars, bumper jars, and drill collars are run above the roller. When the desired depth is reached, right hand rotation and the eccentric action of the roller will return the casing to its original shape and id.
More severely collapsed casing can be repaired with the casing swedge. A bumper jar, hydraulic jar, and drill collars are located above the swedge. The swedges driven through the damaged section by hitting down with the bumper jar and drill collars, opening the casing to its original shape and id. The hydraulic jar allows the swedge to be retrieved if it becomes stuck during this procedure.
When the problem is parted casing, bringing the two sections into correct alignment requires still other more specialized rather for remedial tools. The most effective of these is a guide assembly and watermelon mill called a lace joint. The lace joint is lowered down drill collars into the bottom casing. And the milling section is worked back and forth through the parted area until the separated casings are realigned.
To cement the joint sections together, the operator uses a casing alignment tool. The od of this tool is built to drift the id of the casing and it is run by the lower cement retainer. The casing alignment tool is placed across the separated casing and the retainer is set. Cement is pumped through the casing alignment tool throught the casing wall and into the formation sealing the casing joint 360 degrees around the external casing wall. After the cement sets, the cement retainer and alignment too are completely drilled out, achieving proper id size and integrity.
When all casing repair methods fail, it becomes necessary to sidetrack if the well as to be saved. Although a sidetrack can be accomplished by cutting or milling a section through the casing and then drilling out using a directional assembly using up whipstock to mill a window is usually the most effective and least costly procedure to establish a sidetrack.
Weatherford whipback back is one of the most popular whipstocks in use today. The whipback is a bottom trip whipstock which can function as a permanent whipstock or can be removedafter the sidetrack whole has been drilled. A solid bottom is required to set the whipstock. A bridge plug is frequently used for this purpose. The bridge plug should be set approximately five feet above a casing collar. This will allow the window to be milled through the tube portion of the casing avoiding the thicker coupling area.
The whipstock is connected to a starter mill with the shear bolt and lowered into the well on the workstring. One joined of drill pipe and a mule shoes sub if the face of the whipstock has to be oriented are placed above the starter mill and below the drill collars. If this is a blind sidetrack and the woodstock face or concave, does not have to be oriented in a particular direction. The whipstock is lowered until the bottom trip assembly of the whipback rests on the bridge plug.
2,000 to 4,000 pounds of weight are applied to the whipback, shearing the bottom trip assembly and setting the whipstock. Additional weight is slacked off until the shear bolt attaching the starter mill to the whip stock shears. The whipstock is now seven milling can begin. If the concave has to be oriented in a particular direction, the assembly is lowered to approximately twenty feet above the bridge plug. At this point, a wireline with a gyro is run in the works string until the mule shoes sub has been reached.
Readings are taken to determine which way the concave is facing. After setting that whipback, rotation and circulation are established. The string is slowly lowered until there is some indication that the starter mill has reached the top of the area to be mill. Pile should be marked at this time and milling continued until about 24 inches have been made. All cuttings are circulated out and the work string is pulled out. The starter middle and mule shoes sub are replaced by a window mill and rough od the watermelon mill. This assembly is tripped in the hole to approximately five feet above the whipback.
Circulation and rotation are re-established. The window milling assembly is lower than till the 24-inch section previously milled is reach. Milling proceeds until the window is completed and the milling assembly has penetrated four to six feet of open hole. After the window is established, milling continues back and forth through the window area until the assembly can do so without any torque or dry.
In medium radius horizontal wells, it is sometimes a good idea to make one additional mill run if a long horizontal area is to be drilled. This run will lengthen the window making it easier for the drilling assembly to pass through the window when horizontal reaches long and dragged become severe. Once the new radius or sidetrack is complete, the whipback can be recovered using a special retrieval hook or a threaded die collar. This is particularly useful in producing wells where multilateral boards are added to an existing productive interval.
There are offers of complete line of whipstocks. In addition to the popular whipback, packer-type, hinged open hole whipstocks are also available. Weatherford employees the industry’s widest range of milling tools. Among the most common are junk mills used to mill packers, bridge plugs, cement, perforating guns, drill pipe, tool joints and other obstructions. Junk mills can incorporate a concave, convex or flat bottom depending on the application.
Other models include the cone buster used for milling up rock bitcones. The taper mill used to dress liner tops and clean out tight spots in casings. And the pilot mill, designed to mill casing, liners, rotary shoes and large id tubing. Additionally, Weatherford now features advanced quick cut technology. This alternative incorporates innovative square cut, tungsten carbide inserts which improved chip control and maximize casing penetration. The advantages are faster, more efficient milling performance.

